MacX permits a Macintosh to act as an X window display server, which seamlessly
combines the capabilities of the X Window System with the benefits of the
Macintosh. MacX also acts as a window manager, which enables you to cut and
paste text between Macintosh and X applications.
Text in italic should be typed in by the user.
Installing the MacX 1.5 program
Important: Before installing, restart your computer while
depressing the shift key to disable extensions.
Open (double click) the "MacX 1.5 installation" folder.
Open (double click) the "MacX Installer Script" icon.
You will receive the MacX install dialog box. Click the
 button.
You will receive the MacX Installer Script dialog box. Click the
 button and follow the instructions.
You will have a "MacX 1.5" folder on your hard disk when the installation
is successfully completed.
You should:
You might want to:
-
move the "MacX 1.5" folder to the Communication folder
-
move the "MacX 1.5 installation" folder to the Trash to delete it
Setting up the MacX 1.5 program
Open (double click) the "MacX" icon.
From the Edit menu select Display Preferences... and define the buttons as
in the following dialog box.

Click the
 button.
From the Edit menu select Misc. Preferences... and define the buttons as
in the following dialog box.

Click the
button.
From the Remote menu select New Command... . You will receive the following
dialog box.
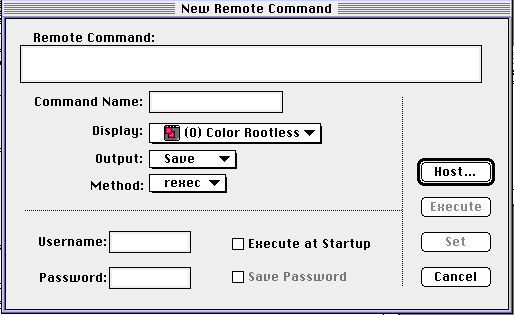
Click the
 button.
You will receive the following dialog box. In the Host Name or Address: box
enter dapsas1.weizmann.ac.il
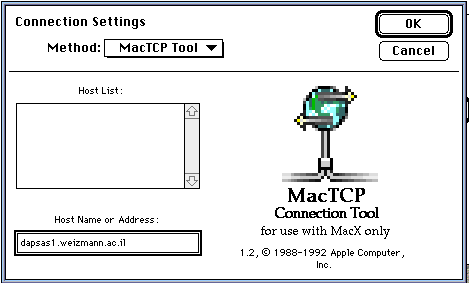
Click the
button.
You will receive the following dialog box. Fill it in according to the sample
below.
Note: In the Command Name, Username, and Password boxes enter your personal information.
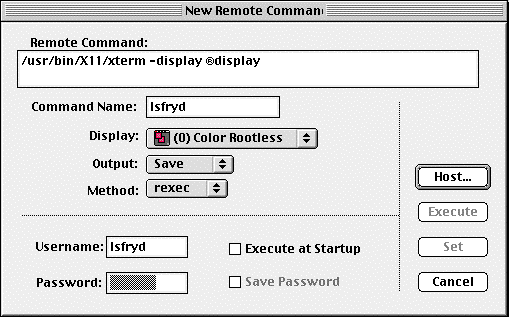
Note: The Remote Command: is as follows:
/usr/bin/X11/xterm "space" -display "space" "ALT-R"display
where "space" is a click on the spacebar and "ALT-R" is a click
on the ALT-key simultaneously with the R-key.
Click the  button.
You will receive an xterm window on your desk.
Write exit to disconnect from the dapsas1 computer.
From the File menu select Quit to exit the MacX program.
You will receive the following dialog box.

Click the  button. You will receive the following dialog box. In the Save as: box
enter your Username.
button. You will receive the following dialog box. In the Save as: box
enter your Username.
Click the  button. This creates a Username icon for further use of the MacX program.
Using the MacX 1.5 program
Double click your Username icon. This will invoke the MacX program.
From the Remote menu select your username.

You will receive the following dialog box.
 .
Enter your password.
.
Enter your password.
Click the
button.
You will receive an xterm window in your home directory.
When you are finished working on the dapsas1 computer:
-
Write exit to disconnect from the dapsas1 computer.
-
From the File menu select Quit to exit the MacX program.

For questions or suggestions please contact:
bio.computing@weizmann.ac.il

 .
.

